PilotOdyssey.com
http://www.pilotodyssey.com/PO/

Fl350 Project Begins.
http://www.pilotodyssey.com/PO/viewtopic.php?f=5&t=12313
Page 1 of 2

Author:  spongerich [ Sun Jun 09, 2013 1:11 pm ]
Post subject:  Fl350 Project Begins.

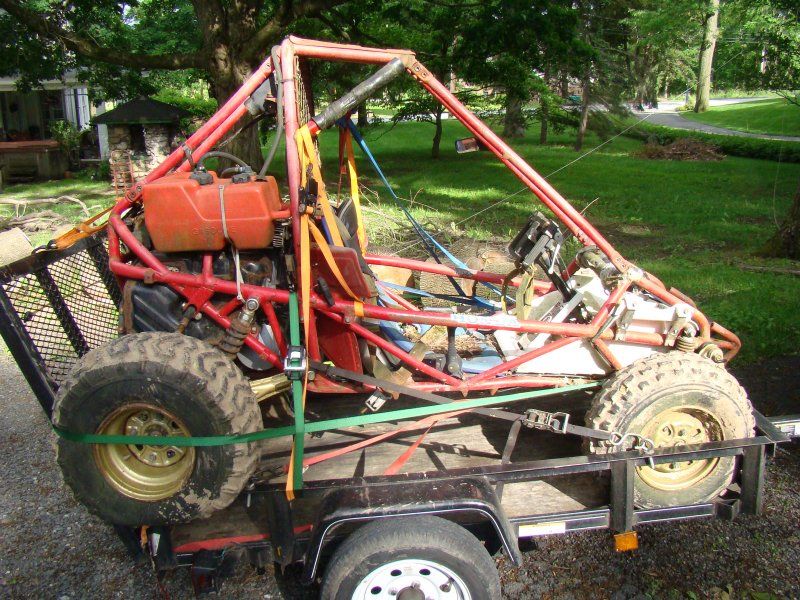
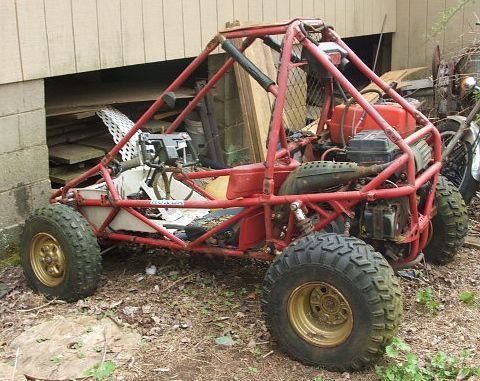
I picked up this FL350 at an estate auction yesterday. I've been looking for one for a long while.
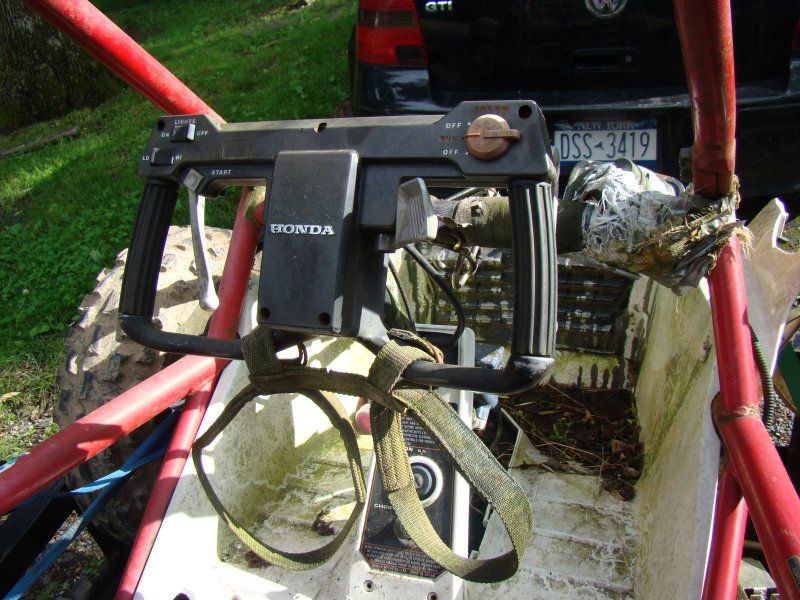
It seems 99% complete (less body work) and the Engine isn't stuck. She's got a Comet clutch and a funky aftermarket gas tank setup. (The one on there was welded all over).


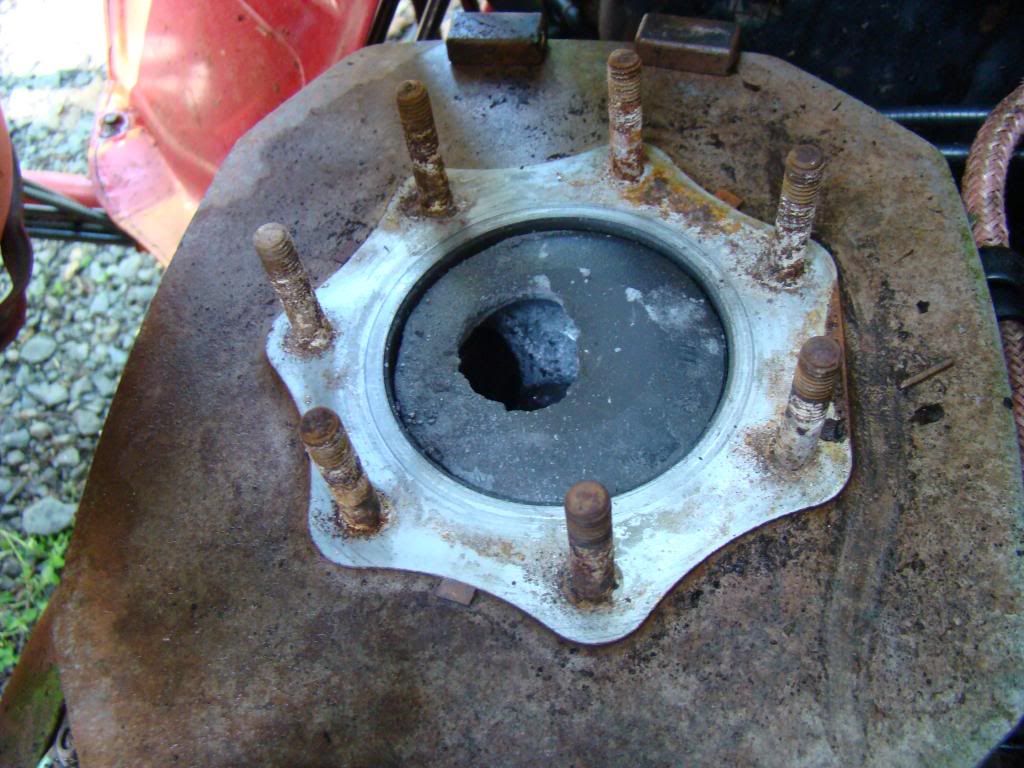
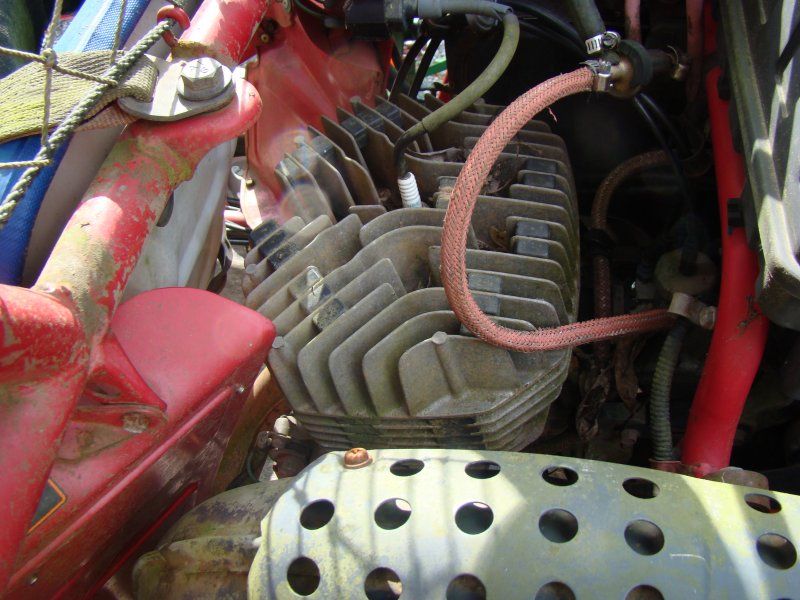
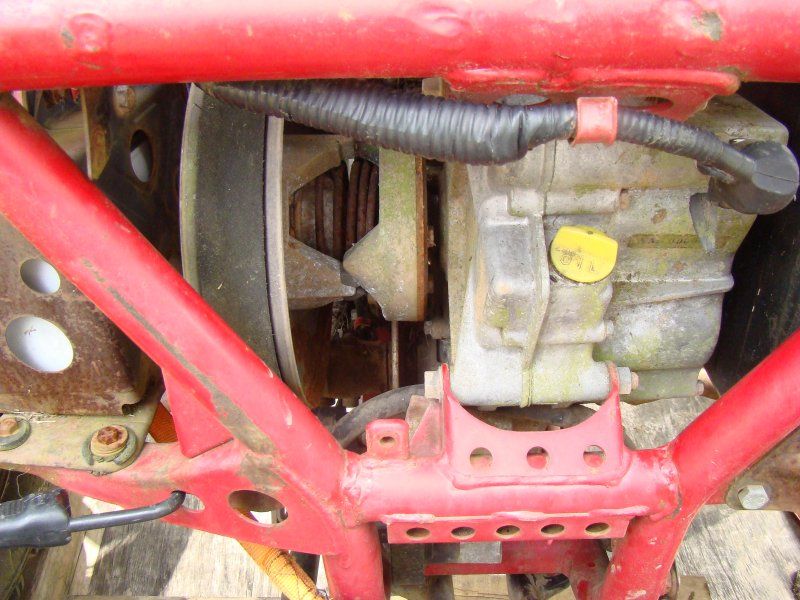
I noticed that the compression was a bit low. This morning I pulled the head and believe that I might have isolated the source of the problem.

Image

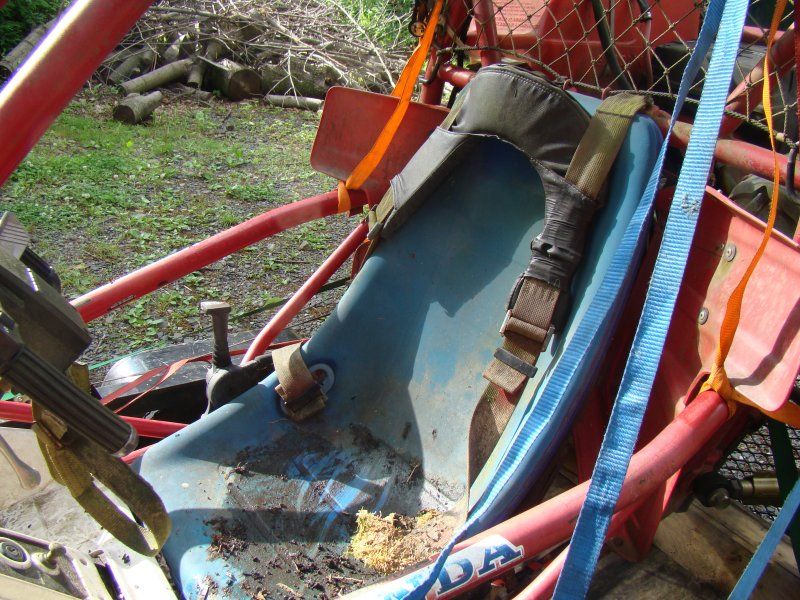
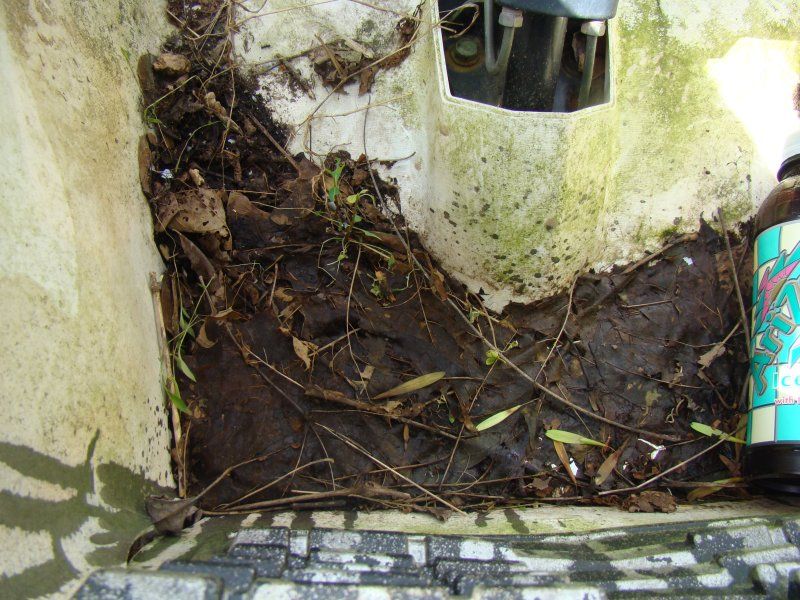
There's very little rust despite it sitting outside for several years. It's got some trees growing in the footwells, but I pressure washed it this morning and it's actually in better shape than I thought. Even with the needed Engine work, I'm pretty happy with the $675 I paid.

Image.
Image.
Image.
Image.
Image.
Image.
Image.
Image.

Author:  B S [ Sun Jun 09, 2013 1:14 pm ]
Post subject:  Re: Fl350 Project Begins.

Welcome to the site

Good to see it has most of the stock parts left on it and a couple of aftermarket ones too
Night 102c clutch
Brakes locked up?
Great price :-)

That's a new one for me on the gas tank :shock:

In case you need an manual

http://g2buggy.g2-innovations.com/gentech/manuals.htm" .".." .".." ."..

Author:  hoser [ Sun Jun 09, 2013 2:09 pm ]
Post subject:  Re: Fl350 Project Begins.

Congratulations on the purchase and welcome to the site looks like it needs a trip to the power washer before you start :shock:

Lots of 350 gurus here to help you will need to go through all the systems to bring it back up to snuff after setting so long, special requirements are required for rebuilding this Engine, their is also issues with the oil level in the balancer case, all kinds of cool mods to enhance its performance.

Keep the pics coming as you progress.

Hope your on the trail soon.

::-:

Author:  accarroll [ Sun Jun 09, 2013 3:21 pm ]
Post subject:  Re: Fl350 Project Begins.

Looks about like mine did when I brought it home.

Author:  spongerich [ Sun Jun 09, 2013 3:39 pm ]
Post subject:  Re: Fl350 Project Begins.

Thanks everyone.

I did some more cleanup and general going through to start making a parts list.

My plan is to limit mods to only things that enhance reliability. We pretty much only ride at my buddy's place and it's fairly remote. Getting parts locally for any of our bikes and quads is nearly impossible, so we like to focus on keeping things running smoothly. The trails are tight with lots of ups and downs, but not too many long straights, so I'm assuming that the performance is going to be *more* than adequate. I have a 250X up there and I almost never use 5th gear.

The right brake lever is stuck - haven't pulled apart the master cylinder yet, but I'm guessing I'll find some rust in there.

I also have a dumb question about removing the seat frame. The seat is off, the bolts holding the frame are loose, but they seem to be captive. What's the trick?

Author:  B S [ Mon Jun 10, 2013 3:58 am ]
Post subject:  Re: Fl350 Project Begins.

Look at the bottom left bolt that's why they Sean like they won't come out and just dangle there


It's so you can adjust the seat without removing all the bolts completely
Hope this helps

Attachments:
image.jpg
image.jpg [ 66.85 KiB | Viewed 1811 times ]

Author:  DMoneyAllstar [ Mon Jun 10, 2013 8:43 am ]
Post subject:  Re: Fl350 Project Begins.

Hey, at least that's a true "external" fuel tank. Granted, its for a boat. But its better than the old "plumb the gas can" trick. lol

You've come to the right place with your project, no doubt.

$675...that's pretty good for a complete roller. Its worth more than that parted, so you're already ahead of the game.

Author:  Randman [ Mon Jun 10, 2013 10:51 am ]
Post subject:  Re: Fl350 Project Begins.

Once the bolts come loose and dangle but don't come out, pull down on them while unscrewing them. They are made like that so if they become completely unscrewed, they don't fall out completely thus you won't loose them.

The front bolts have a shoulder built into them too fit into a three place slot for seat adjustment. The rear screws do not. The bolt on the lower left that BS has pictured is a rear seat bolt.

Rand

Author:  bugeye59 [ Mon Jun 10, 2013 8:58 pm ]
Post subject:  Re: Fl350 Project Begins.

Check all your lil black slippers on the rear driven clutch.
Can see at least one is missing,the reverse one.

Author:  spongerich [ Mon Jun 10, 2013 10:36 pm ]
Post subject:  Re: Fl350 Project Begins.

bugeye59 wrote:
Check all your lil black slippers on the rear driven clutch.
Can see at least one is missing,the reverse one.


Please don't tell me that the clutch has to come off for that! That's one job I was hoping to avoid for now after reading all the horror stories about getting them off.
It already looks like I'll have to remove the comet. The cams are a little rusty and need to be cleaned up or replaced.

Author:  B S [ Mon Jun 10, 2013 10:43 pm ]
Post subject:  Re: Fl350 Project Begins.

spongerich wrote:
bugeye59 wrote:
Check all your lil black slippers on the rear driven clutch.
Can see at least one is missing,the reverse one.


Please don't tell me that the clutch has to come off for that! That's one job I was hoping to avoid for now after reading all the horror stories about getting them off.
It already looks like I'll have to remove the comet. The cams are a little rusty and need to be cleaned up or replaced.

Remove it now so you don't have to mess with it in the future

Author:  bugeye59 [ Mon Jun 10, 2013 11:04 pm ]
Post subject:  Re: Fl350 Project Begins.

Have a look see in the hole,if the lil round black nub is still in there,need to dig it out.
Either with a pick,pointy screw,screwed in,hot wire melt into it,or my fave...the Lynda Mityvac!
Sometimes with a good sealing tube you can suck that sucker out.

Yes removing the driven can be a bitch,but with the proper puller,and patience you'll be right!
I tapped the 3 holes on the outer driven boss,then fab'd up a round puller plate.
Was still too seized and too much on those 3 threads.So I added an external collar that went round the edge of the boss as well.
I welded that collar to the front puller plate.Then added holes around the collar edge,for self tappers to bite into the alu boss.
This way you have the 3 main face bolts into the tapped OEM holes,plus many as you like screws around the collar to boss edge section.
Mine was like trying to seperate a sailor off your sister! :shock:
Method is to tighten up the puller bolt hard as you dare,then small tap taps on the bolt end.Tighten up a bit more,tap tap.
Keep repeating this till you can't get anymore turn on the bolt,leave it for a while come back and repeat.
Mine took about 3 days,but got it off in one piece.

When you install it all back on,DON'T forget to lube the shaft up slimey as a Bull's nostril! :-)

Author:  B S [ Mon Jun 10, 2013 11:34 pm ]
Post subject:  Re: Fl350 Project Begins.

bugeye59 wrote:
Have a look see in the hole,if the lil round black nub is still in there,need to dig it out.
Either with a pick,pointy screw,screwed in,hot wire melt into it,or my fave...the Lynda Mityvac!
Sometimes with a good sealing tube you can suck that sucker out.

Yes removing the driven can be a bitch,but with the proper puller,and patience you'll be right!
I tapped the 3 holes on the outer driven boss,then fab'd up a round puller plate.
Was still too seized and too much on those 3 threads.So I added an external collar that went round the edge of the boss as well.
I welded that collar to the front puller plate.Then added holes around the collar edge,for self tappers to bite into the alu boss.
This way you have the 3 main face bolts into the tapped OEM holes,plus many as you like screws around the collar to boss edge section.
Mine was like trying to seperate a sailor off your sister! :shock:
Method is to tighten up the puller bolt hard as you dare,then small tap taps on the bolt end.Tighten up a bit more,tap tap.
Keep repeating this till you can't get anymore turn on the bolt,leave it for a while come back and repeat.
Mine took about 3 days,but got it off in one piece.

When you install it all back on,DON'T forget to lube the shaft up slimey as a Bull's nostril! :-)

and make sure you sand the crap out of the shaft so its nice and smooth again
if i rember right i used 220 or 280

Author:  spongerich [ Wed Jun 12, 2013 2:23 pm ]
Post subject:  Re: Fl350 Project Begins.

Well, I found some good news on the Engine rebuild. The cylinder is a bit scored, but I measured it out at 78.54mm so it looks like there's plenty of room to bore it out to where it needs to be. Hopefully I won't lose too much. Hard to measure the scoring (and the piston isn't out yet) but I don't see anything that looks like it's more than 1mm deep, so I think I'm going to be in good shape.

Author:  nickRNR [ Wed Jun 12, 2013 6:26 pm ]
Post subject:  Re: Fl350 Project Begins.

The news about the cylinder is good, but since it is so hard to find Honda pistons these days, your best bet is to pick up an 80mm wiesco piston and bore it to 80mm being sure to prep the piston, set clearance where it needs to be, chamfer the ports on the cylinder, drill the 3 oiling holes in the piston as the wiesco instructions say, and also relieve the exhaust bridge on the cylinder.

Author:  DMoneyAllstar [ Thu Jun 13, 2013 8:13 am ]
Post subject:  Re: Fl350 Project Begins.

nickRNR wrote:
The news about the cylinder is good, but since it is so hard to find Honda pistons these days, your best bet is to pick up an 80mm wiesco piston and bore it to 80mm being sure to prep the piston, set clearance where it needs to be, chamfer the ports on the cylinder, drill the 3 oiling holes in the piston as the wiesco instructions say, and also relieve the exhaust bridge on the cylinder.


Do not ignore this advice! IMO its absolute "must-do" for the FL350R Engine.

Author:  stix [ Thu Jun 13, 2013 7:29 pm ]
Post subject:  Re: Fl350 Project Begins.

Such a good sight to see another come back from the dead. Good luck with your rebuild!

Author:  spongerich [ Thu Jun 13, 2013 11:52 pm ]
Post subject:  Re: Fl350 Project Begins.

Progress today... sort of.

I got the cylinder jug off without damaging anything other than the nut that was stuck and rounded off.

As I feared, there was a bunch of melted aluminum crumbs from the big hole in the piston, so it looks like I'll be taking the Engine out and splitting the case for a good cleaning. I was hoping to avoid that, but I pretty much knew it was inevitable. I've done a bunch of top ends on 2 strokers before, but this'll be my first foray in opening up the bottom (other than some seriously broken engines I've disassembled for parts).

Any thoughts as to whether I should try to remove the clutch while the Engine is still in the frame? Looks like a little less access, but I'll have a bit more leverage than I will if the Engine is sitting on the bench. I'm planning on making a puller tomorrow, so I think I'll probably give it a shot.

The good news is that I'm well on my way to getting my shopping list of parts I'm going to need to get her back on the road.. the bad news is that it's already becoming a pretty long list.

Author:  B S [ Fri Jun 14, 2013 12:00 am ]
Post subject:  Re: Fl350 Project Begins.

pop off the clutch while its in the frame is what i do

Author:  stix [ Fri Jun 14, 2013 8:36 pm ]
Post subject:  Re: Fl350 Project Begins.

While you have the cases apart be sure to do the "oil in starter" vent mod and plug that hole. Also would be a good time to replace starter brushes and turn/replace armature if needed.

Author:  B S [ Mon Jun 17, 2013 5:47 pm ]
Post subject:  Re: Fl350 Project Begins.

stix wrote:
While you have the cases apart be sure to do the "oil in starter" vent mod and plug that hole. Also would be a good time to replace starter brushes and turn/replace armature if needed.


Randman has an great write up on that

viewtopic.php?t=6309

Author:  spongerich [ Mon Jun 17, 2013 6:47 pm ]
Post subject:  Re: Fl350 Project Begins.

I made a puller today and got the clutch off. It needs a little TLC but I think it'll be OK.

At first, I just tried using the pressure of the puller... no go.

Then I filled the bore with some really thick old grease I found... couple wraps of teflon on the threads and then I hit it with my impact. It popped off with a loud BANG.

Now on to the driven clutch.... with the belt off, I can see that the faces are a bit rustier than I thought. When I get it off and apart, I'm going to give it a soak in some evaporust and see how pitted it is. If the face is flat (rather than convex) I might try facing it in my lathe.

I'm hoping to get the cylinder out for boring later this week.

I also found a good deal from another member on some front shocks, so I don't need to worry about rehabilitating those. The rears don't look great, but if I can get them apart and moving I'll probably just powdercoat the springs and run them until I can find some replacements.

Anyone had any luck finding some snowmobile shocks that are a reasonable substitute? I know that Works are the preferred route, but they're not in my budget at the moment.

Author:  DMoneyAllstar [ Tue Jun 18, 2013 8:56 am ]
Post subject:  Re: Fl350 Project Begins.

Yep, those tapered shafts are like a jack-in-the-box. You keep inching that wrench forward and, inching, and inching, and....KABLAMO! Off she comes. lol

Works shocks valved for the buggy and weight will be the best bet on the stock j-arms.

Author:  spongerich [ Sat Jun 29, 2013 4:21 pm ]
Post subject:  Re: Fl350 Project Begins.

Made a bit of progress this week. I've gotten the primary clutch mostly apart. There's a local snowmobile guy who's got the spider tool, so I'm hoping to get it up there and have him pull it apart for me. The cam arms don't look too bad, some minor pitting, but I think they'll work. The rollers might be shot but I won't know for sure until the spider is off. I also managed to remove the driven clutch... I grabbed a harmonic balancer puller from the local AutoZone for $17 and drilled and tapped the holes in the hub. Came off without much of a fight. I also got one front brake apart and was happy to find it in pretty decent shape.. hoping my luck holds out for the other side.

Author:  shoubadaba [ Sat Jun 29, 2013 4:24 pm ]
Post subject:  Re: Fl350 Project Begins.

Sounds like your making good progress. Its nice to see more and more odysseys come back to life

Page 1 of 2 All times are UTC - 5 hours [ DST ]
Powered by phpBB® Forum Software © phpBB Group
https://www.phpbb.com/