Speed Lab 101
Selection of powerplant modifications depend largely on your ability to apply useful power in accordance with your skill level and/or financial condition of your wallet. Professional or national level racing requires careful selection and matching of racer to equipment. Obviously, a national level racer wouldn't succeed on a power-deficient machine, just as a novice would have problems with an over-powered machine. Most people receive most benefit from reliable, sturdily built watercraft, with good midrange power. After all, most of us aren't up to controlling a 50+ mph stand up watercraft, and we're a lot better off with a long-lasting machine than an explosive racer.
So, if we don't really need excessive power, why bother with mods at all? There are good reasons. It's not unusual to find a number of seriously deficient parts on a brand-new watercraft. For example, the crank may be out of tolerance, the flywheel out of balance, crankcases may have casting imperfections, the cylinder ports may be mismatched, etc. It's safe to assume that manufacturers, dealers, and mechanics aren't really interested in product longevity, so it's up to you to decide what you truly want from your personal watercraft, and then work for that.
Here's a bit of advice: Before performing any modifications, invest plenty of time into researching performance or aftermarket accessories. In many cases, some of them will actually diminish a stock machine's performance - a costly disappointment, to say the least. Check around; seeing is believing. Talking to people who have experience with that product is your best source of unbiased information. When selecting a performance shop, don't hesitate to ask for references - they're your most valuable source of information regarding the quality of the shop's work. Remember that "experts" are a dime a dozen, but skill and honesty are hard to find.
Let's take a closer look at how to perform practical and realistic performance mods without having to take out a second mortgage on your house. It's possible to build an entry-level race machine using a limited number of aftermarket parts and utilizing the remaining original equipment to it fullest. My 1987 650SX was blueprinted when it was new, and now has over 2000 hours on it. I still run the original crank, flywheel, cases, and pistons. My maintenance consists of replacing seals and gaskets yearly, periodic adjustments, and proper storage techniques. The 650 is still competitive, and pegs a consistent 48 mph. So I know it's possible to build a competitive, reliable watercraft for a reasonable price.
Most shops begin their modifications by installing larger carburetors, changing compression ratios, and porting the cylinder. However, the most important parts - crank, flywheel, cases - are overlooked. Such practices lead to very expensive problems in a short amount of time. So I believe that you should take your mods one step at a time, ensuring the most reliability and performance for your money and effort.
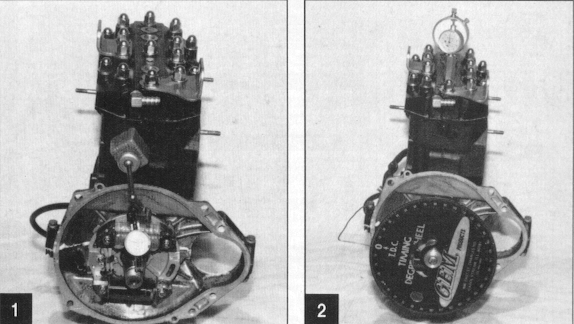
PHOTO ONE: My work begins by inspecting the crank's tapered end. After removing the flywheel, I measure the deflection with a dial indicator. If the reading is 0.002" or less, the crank is okay. But, if the reading reaches 0.004" or More, I recommend replacing the crank. This simple procedure can save you countless dollars.
PHOTO TWO: Along with the deflection test, the crank is inspected to ensure that there is a true 180-degree spacing between pistons. If the crank isn't at 180 degrees, your machine will never develop full power. Set up a degree wheel at top dead center. Install a short shaft dial indicator in the front cylinder. Rotate the crank in one direction, say 10 degrees. Note the indicator reading. Let's say it reads 0.027". Now, rotate the crank in the opposite direction to 10 degrees on the other side of the wheel. If the indicator reads 0.027", you have true top dead center. If not, move the pointer accordingly, until you are reading the same angle on both sides of zero. Now, install a long shaft indicator in the rear cylinder. Follow the same procedure for the rear piston as you did with the front piston. If you rotate the crank 10 degrees in either direction and get the same measurements in both directions, your crank is at 180 degrees. But, let's say that the clockwise 10 degree measurement is 0.010", and the counterclockwise measurement is 0.053". In this case, you have a crank that is twisted approximately 2 degrees. In general, a 2-degree twist will show up as a 0.050" difference in piston timing. When this is the case, your engine will never develop full power.
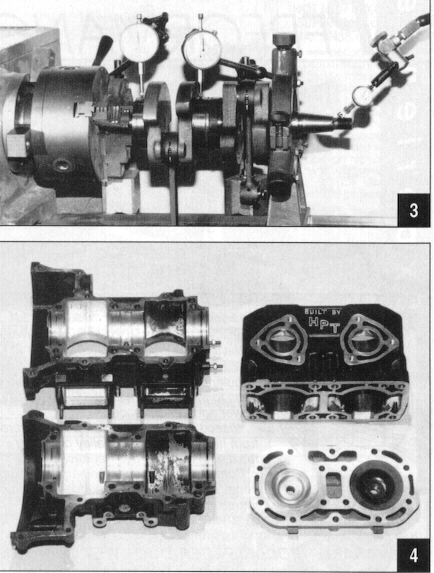
PHOTO THREE: When inspecting the crank for trueness, it must be set up in its normal rotating position, meaning that it must rest on its main bearings. This is the only way to correctly determine if the crank deflection is within limits. Measuring the crank between centers is not an accurate way to measure deflection for a couple of reasons. First, it's easy to squeeze the crank together 0.004" or 0.005", in which case a perfectly good crank can be mistaken for an out-of-limits unit. Second, a bad crank can be squeezed together and mistaken for a good unit.
PHOTO FOUR: Take a very good look at these cases. The left sides have been blueprinted, which makes life easy for your bearings, bore, and pistons. On the right sides, there are light spots where the paint is missing, the biggest cause of engine wear. When cases are molded, they are cast in a sand mold. Once the mold has cooled, the newly-formed cases are removed from the sand. Particles of sand are left imbedded in the surface of the cases. The manufacturer doesn't take the time to physically grind away these sand particles - they just cover them up with a coat of paint. As time passes, the effects of fuel, oil, and heat cause the paint to peel away from the cases, exposing the sand. The particles break away from the surface and find their way into the moving parts of your engine. One of the reasons my motor has lasted so long is that I blueprinted my cases and ground away all of the sand particles left in the cases.
THE NEED FOR SPEED
As far as speed goes, in my experience, practical modifications should be limited to 8000 rpm for a 550cc machine (which should yield speed of around 46 mph), and 7200 rpm for a 650 (which should get you about 48 mph). Attempts to exceed these limits will become costly, since you can figure that once you reach 50 mph, each additional mph will cost you about $500 in modifications alone. Add in the 50 percent decrease in engine reliability and corresponding increase in the cost of replacement parts, and you're looking at some bucks. Quite often, a mildly modified machine will outperform a highly modified machine on the same course. How? Because most of us are going to be able to control a 48-mph stand up craft much better than we could handle a missile doing 50+. Since we're more in control, we'll ride better, and therefore turn faster lap times. And since we don't have big- time sponsors footing the bills if our craft break, we need the extra reliability of the less-modified machine.
To increase your speed to match your ability, I recommend taking the following steps:

PHOTO FIVE: This shows the damage that a flywheel can cause. The left flywheel was out of balance, causing lit to be friction-welded to the end of the crank. On the bottom left is an extreme example of what an out of balance crank can do to your motor. The flywheel broke off, destroying itself, the crank, and the motor. The right flywheel was over-modified by a so-called "performance shop." They machined too much material away, causing it to fail, destroying the motor in the process, a $2300 mistake.
SIZING UP SEIZURES
It's one thing to suffer a seizure by accident, but it's a different story when the seizure is caused by your mechanic's mistakes. If you want to see what happens when shortcuts are taken during engine work, look closely at the following pictures. A "reputable" performance shop decided that gaskets should be removed with a hand grinder and sanding disk, practices that resulted in a customer's newly-rebuilt engine self-destructing after exactly 15 minutes! Thanks to his mechanic's shortcuts, this rider is out $2000! It's a lot cheaper to take the time and do the job right the first time, believe me.
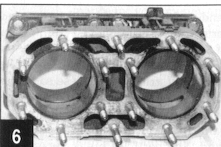
PHOTO SIX: This is a common problem. The right-hand bore has two black spots protruding into the water jacket from the cylinder bore at the 11:00 and 1:00 positions. The left-hand bore has leakage at 9:00, 11:00, and 1:00. Overlooking something like this leads to big trouble.
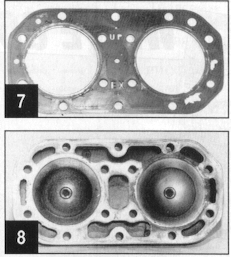
PHOTO SEVEN: Notice the holes burnt into this gasket at 3:00 and 5:00. Another symptom you'd better pay attention to.
PHOTO EIGHT: Once again, notice the black areas on the right cylinder at 11:00, 1:00, 3:00, and 9:00. This indicates exhaust gases blowing into the water jacket. On the left, notice the light areas in the combustion chamber dome from 11:00 to 2:00. This indicates that water was leaking into the combustion chamber. All this could've (and certainly should have) easily been detected and avoided if the mechanic had performed a simple leakdown test.
FUN WITH FLYWHEELS
The flywheel is as important to performance as the pistons and crank. Treat it with the same care.
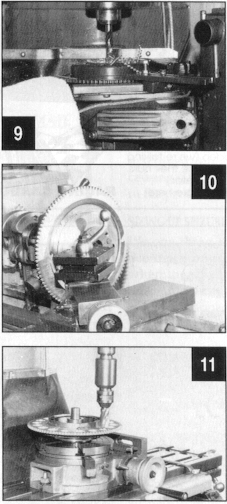
PHOTO NINE: This is what happens when you push the starter button when the motor is running. On this motor, the flywheel spun around on the crank, causing the keyway to shear off. This caused the flywheel to become lodged onto the crank with no way to remove it. The only way to remove the flywheel was to place the entire motor on the milling machine and machine the flywheel off the crank. The cost of hitting the wrong button at the wrong time: $1800.
PHOTO TEN: Demand accuracy in your modifications. This is the proper way to machine a flywheel. The roughly machined flywheel is mounted on the crank and then the entire unit is machined as one. This results in a perfect concentricity.
PHOTO ELEVEN: After the outside diameters are machined, the starter ring gear can be lightened by boring round holes in it. Structural integrity is ensured by evenly spacing the holes and leaving enough material to withstand starter torque. No modification is complete without precision balancing. This ensures a smooth-running rotating mass and long engine life. I recommend re-balancing the flywheel at the end of each season. This is because the engine, when shut off, comes to rest at approximately the same position every time. During a season, your machine will have been started literally hundreds of times. Each time the starter engages the flywheel, small metal shavings are removed from the 9 flywheel teeth. Over the course of a season, enough metal shavings will have been removed to cause the flywheel to become out of balance again.
George Grabowski HPT Sport USA