Board index

My Home Page

PilotOdyssey.com By hoser...


PilotOdyssey.com Chat Room

PilotOdyssey.com Photo Album

* Login   * Register * FAQ
http://www.pilotodyssey.com/PO/adm/images/imagemenu/smiley_cool.png PilotOdyssey.com Chat    http://www.pilotodyssey.com/PO/adm/images/imagemenu/find.png PilotOdyssey.com Google Search    http://www.pilotodyssey.com/PO/adm/images/imagemenu/emoticon_tongue.png FL400 Parts    http://www.pilotodyssey.com/PO/adm/images/imagemenu/emoticon_grin.png FL350 Parts    http://www.pilotodyssey.com/PO/adm/images/imagemenu/emoticon_evilgrin.png FL250 Parts    http://www.pilotodyssey.com/PO/adm/images/imagemenu/emoticon_unhappy.png Admin Email   
It is currently Tue Mar 19, 2024 5:39 am

All times are UTC - 5 hours [ DST ]


Post new topic Reply to topic  [ 136 posts ]  Go to page Previous  1, 2, 3, 4, 5, 6  Next
Author Message
PostPosted: Wed Apr 04, 2012 8:50 am 
Offline

Joined: Mon Dec 15, 2003 2:40 pm
Posts: 22507
Location: Chicago
MAS Racing wrote:
Back when I was a kid growing up watching my sisters boyfriend and friends build their engines ect., I saw that they would always buy that blue silicone and put a good 1/4" bead across the oil pan, valve cover, ect. I watched it all ooze out the edges. I must have been about 8 yrs old at the time and I would ask them didn't you put too much? They would tell me that that helps seal it even better. (silicone homos) Within a couple of days their vehicles would start leaking every single time. They are still doing the same thing today.

They always say that they tought me everything I know. And I answer that yes they tought me what not to do.


I have seen that trick before too, I have also seen where you rev the Engine and the oil pressure drops then you remove the oil pan and dig the chunks of silicone out of the pick up screen of the oil pump, after a while the stuff you see oozing out falls off inside the Engine then it migrates to the oil pickup, you don't even need it on a oil pan or valve covers to make them seal for 200k trouble free leak free miles lmao.


Top
 Profile E-mail  
 
PostPosted: Wed Apr 04, 2012 4:56 pm 
Offline

Joined: Thu Mar 31, 2011 12:49 am
Posts: 531
Location: Carson City, NV
hoser wrote:
MAS Racing wrote:
Back when I was a kid growing up watching my sisters boyfriend and friends build their engines ect., I saw that they would always buy that blue silicone and put a good 1/4" bead across the oil pan, valve cover, ect. I watched it all ooze out the edges. I must have been about 8 yrs old at the time and I would ask them didn't you put too much? They would tell me that that helps seal it even better. (silicone homos) Within a couple of days their vehicles would start leaking every single time. They are still doing the same thing today.

They always say that they tought me everything I know. And I answer that yes they tought me what not to do.


I have seen that trick before too, I have also seen where you rev the Engine and the oil pressure drops then you remove the oil pan and dig the chunks of silicone out of the pick up screen of the oil pump, after a while the stuff you see oozing out falls off inside the Engine then it migrates to the oil pickup, you don't even need it on a oil pan or valve covers to make them seal for 200k trouble free leak free miles lmao.


But that adds extra slippyness to the oil, they said. :-)


Top
 Profile E-mail  
 
PostPosted: Wed Apr 04, 2012 7:25 pm 
Offline

Joined: Tue Dec 23, 2003 10:31 pm
Posts: 5559
Location: New Jersey
Hoser, Carbpartswarehouse called. Carb needle is backordered till Monday of next week so carb will not ship till then to you. Just a FYI in case your expecting it sir!


Top
 Profile E-mail  
 
PostPosted: Sat Apr 14, 2012 7:19 pm 
Offline

Joined: Mon Dec 15, 2003 2:40 pm
Posts: 22507
Location: Chicago
Quick update, had some time today so I installed the Engine and the exhaust pipe, I wanted to get the Engine in and exhaust on so the silicone sealer I use to seal the exhaust system would have a full 24 hrs to cure before I start the Engine, more info on the silicone here http://www.pilotodyssey.com/Siliconesealer.htm

I also removed the skid plate so I can do fluid changes this Pilot has a after market skid and no provisions for checking the balancer oil level or changing the transmission and balancer oil kinda makes me wonder if the skid plate and the bolted in solid 'suspension seat' that takes a good hour to remove so you can remove the 'fire wall' that is required to keep the 'suspension seat' form melting so you can add more oil to the balancer case.

Adding all this ATV Racing shit really screws you when it comes time to do maintenance on a Pilot, I don't know about other owners but after every ride trip where I burn 10 gallons of gas or more I change the oil on the balancer and the transmission, the first thing I do after a ride trip is remove the seat and pressure wash the entire Pilot then do maintenance.

For some reason I don't see owners of Pilots that is loaded up with all the ATV Racing shit accessories being very faithful to maintenance.

Long list of things left to do on this Engine rebuild, I gotta figure out how to flush out the cooling system before I run it right now I think I will just fill the system with distilled water and run it for 10 min with the electric water pump then drain and take it from their, remember the mud looking shit that came out of the cylinder on the bench?

Image

Below are a few pics of the Engine and exhaust installed.


Attachments:
DSC01900.JPG
DSC01900.JPG [ 98.13 KiB | Viewed 5174 times ]
DSC01901.JPG
DSC01901.JPG [ 95.48 KiB | Viewed 5174 times ]
DSC01903.JPG
DSC01903.JPG [ 76.15 KiB | Viewed 5174 times ]
DSC01904.JPG
DSC01904.JPG [ 81.92 KiB | Viewed 5174 times ]
Top
 Profile E-mail  
 
PostPosted: Sat Apr 28, 2012 10:41 am 
Offline

Joined: Mon Dec 15, 2003 2:40 pm
Posts: 22507
Location: Chicago
Update, fixed the battery cable where it connects to the starter, some retard attempted to solder a wire 1/2 the size of the starter cable to the end of the factory starter cable, don't ask me why, stupid I guess, then when they attempted to solder it only got it hot enough to actually bond about 1/2 the small wire they used.

Who ever did this is completely clueless and way out of their element.

I took a short piece of 3/8" copper tubing and flatten out one end punched a hole in it then soldiered the other end to the factory battery cable.

Like most everything else on this Pilot the factory rubber boot that protects the terminal on the starter is gone it was probably too much trouble for someone to keep track of it or to reinstall?

Something as simple as hooking up a starter that normally takes 2 minutes turned into over an hr I see a endless supply of Jackassery on this Pilot.


Attachments:
DSC02025.JPG
DSC02025.JPG [ 73.76 KiB | Viewed 5145 times ]
DSC02026.JPG
DSC02026.JPG [ 81.87 KiB | Viewed 5145 times ]
DSC02027.JPG
DSC02027.JPG [ 84.75 KiB | Viewed 5145 times ]
DSC02029.JPG
DSC02029.JPG [ 74.77 KiB | Viewed 5145 times ]
DSC02030.JPG
DSC02030.JPG [ 72.05 KiB | Viewed 5145 times ]
Top
 Profile E-mail  
 
PostPosted: Sat Apr 28, 2012 10:45 am 
Offline

Joined: Mon Dec 15, 2003 2:40 pm
Posts: 22507
Location: Chicago
Gas tank reinstalled, this is the almost worthless fuel filter that was installed judging by the dirt I found in the float bowl of the carb this filter must have cost about 1.00 I installed a NEW Honda OEM CORRECT filter in its placed, who ever installed this one had a long loop of fuel hose that looped around close to the exhaust and Engine then back up to the fuel pump I guess they routed it close to the exhaust to preheat the gas????? (Jackassery again) I understand using the extra length of hose so you could skillbilly in the WRONG filter but running it by a heat source?


Attachments:
DSC02031.JPG
DSC02031.JPG [ 85.82 KiB | Viewed 5145 times ]
Top
 Profile E-mail  
 
PostPosted: Sat Apr 28, 2012 11:03 am 
Offline

Joined: Mon Dec 15, 2003 2:40 pm
Posts: 22507
Location: Chicago
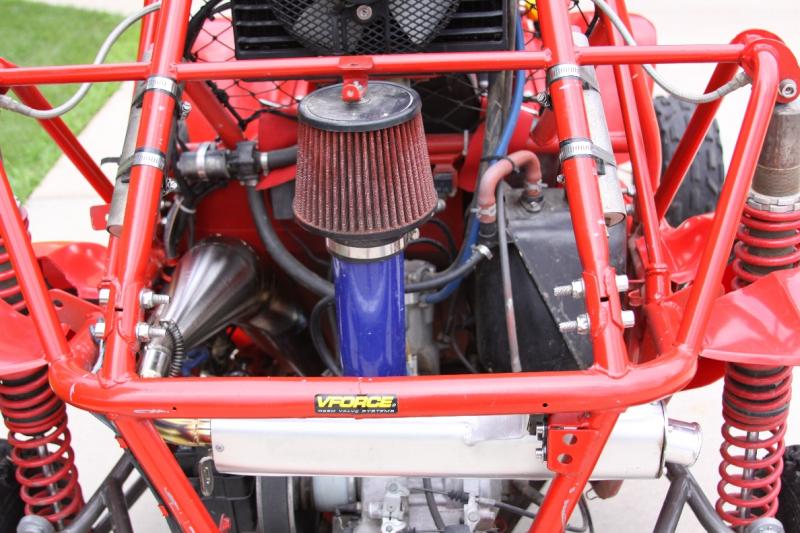
Got it outside for a few heat cycles yesterday, its raining today not sure if I will be able to get it back outside for more heat cycles or not, factory air box installed no prefilters yet, wont need any test riding around here.

Anybody remember the air filter this Pilot came with, the super STUPID ATV Racing inspired "Desert Filter" have you ever seen a dumber idea especially if your going to ride in a "desert"

Image


The "Desert Filter" is just a LONG LIST of stupid shit ATV Racing has come up with over the years they have MANY other STUPID ideas they invented over the years for the Pilot, I have to hand it to them they were smart enough to take ALOT of peoples hard earned money in the process, this Pilot has more ATV Racing stupid installed on it just to list a few it has the "bump steer kit" that is nothing short of a joke you have to weld to the frame and BUTCHER your tub by cutting holes in the floor to force their invention to fit the Pilot, it has the "beard suspension seat kit" that requires you to do more butchery on your frame and more welding to make it work, I guess the designers at ATV Racing are NOT smart enough to make a bolt in kit that would allow you to reuse the factory adjustable seat mounting, a simple adapter bracket is all that's required, guess they were unable to see this or think of it? You should see their POS full belly skid plate, it only takes about 1 day to remove it the design is soo piss poor it also LOWERS the ground clearance under the Pilot by over 2" not sure why you would want LESS ground clearance?

This Pilot also has the radiator relocate "kit" you have to weld on the frame, the kit I made to relocate my Pilot radiator to the same location on my Pilot bolts on to existing bolts NO WELDING REQUIRED!

That bunch at ATV Racing is a real smart group of guys lmao, did I ever tell you about selling customers the WRONG offset front rims story, this is where ATV Racing is really smart they sell you a set of rims that are the wrong offset and cause a horrendous bump steer problem on the Pilot to cure this they sell you a bump steer kit that requires you to butcher up your foot tub and weld to the frame for about 450 bux, then for another 150 bux they sell you a steering damper to help correct the affects of selling you the WRONG OFFSET RIMS, gotta hand it to them they manage to generate over 1000.00 in sales by just selling you a set of rims.

lots more to be said about these guys and their wisdom.


Attachments:
DSC02033.JPG
DSC02033.JPG [ 101.31 KiB | Viewed 5144 times ]
DSC02038.JPG
DSC02038.JPG [ 89.3 KiB | Viewed 5144 times ]
DSC02040.JPG
DSC02040.JPG [ 90.37 KiB | Viewed 5144 times ]
Top
 Profile E-mail  
 
PostPosted: Sat Apr 28, 2012 11:08 am 
Offline

Joined: Mon Dec 15, 2003 2:40 pm
Posts: 22507
Location: Chicago
Anybody remember when I pulled the Engine and put it on the bench all that crap that ran out of the cylinder, mucky crapola, here is a pic.

Image

Well after rebuilding and reinstalling the Engine I decided I better just put in straight distilled water in the coolant system for the first few heat cycles then drain to flush out any crap in the system, glad I did look at what came out after 2 heat cycles, I will refill again with just distilled water for a few more heat cycles once the system is clean I will fill with 50/50 green anti freeze, I have no idea what kinda of jackassery you have to pull to make the inside of a coolant system look like this, just taking a guess that someone added a bunch of cooling system additives over the years and created some sort of chemical soup that has completely fouled up the coolant system.


Attachments:
DSC02043.JPG
DSC02043.JPG [ 49.54 KiB | Viewed 5142 times ]
Top
 Profile E-mail  
 
PostPosted: Sat Apr 28, 2012 11:25 am 
Offline

Joined: Mon Dec 15, 2003 2:40 pm
Posts: 22507
Location: Chicago
Any ideas how you want to do a prefilter system on this Pilot Mudbogger with the radiator located up high their is no room to install the 2 pre-filters like we usually do.

Ideas?

I have not cut the air box lid until I hear from you, custom air box cover/filter?

Prefilter like Afastcar did for his where the filter is just one large hole in the lid and a single filter located on the box?

For others not sure what I am talking about here is a link to my setup viewtopic.php?f=1&t=3211&start=0

Here is the Afastcar setup, I see bunch of them pics are missing grrr! but enough is their you get the idea. viewtopic.php?f=1&t=4258&hilit=air


Top
 Profile E-mail  
 
PostPosted: Sat Apr 28, 2012 12:17 pm 
Offline

Joined: Tue Dec 23, 2003 10:31 pm
Posts: 5559
Location: New Jersey
hoser wrote:
Any ideas how you want to do a prefilter system on this Pilot Mudbogger with the radiator located up high their is no room to install the 2 pre-filters like we usually do.

Ideas?

I have not cut the air box lid until I hear from you, custom air box cover/filter?

Prefilter like Afastcar did for his where the filter is just one large hole in the lid and a single filter located on the box?

For others not sure what I am talking about here is a link to my setup viewtopic.php?f=1&t=3211&start=0" ."..

Here is the Afastcar setup, I see bunch of them pics are missing grrr! but enough is their you get the idea. viewtopic.php?f=1&t=4258&hilit=air" ."..


Yes Hoser let's try the Afastcars prefilter setup but can we angle it inward so the prefilter does not stick out from under the cage please?
I will order the filter when I get home home from work, doing triple shift currently. Do you need me to ship you the materials needed for this upgrade or is just the filter itself good? I will use stockings over the prefilter not the KN one Afastcar used on his.


Top
 Profile E-mail  
 
PostPosted: Sat Apr 28, 2012 12:25 pm 
Offline

Joined: Mon Dec 15, 2003 2:40 pm
Posts: 22507
Location: Chicago
Quote:
Yes Hoser let's try the Afastcars prefilter setup but can we angle it inward so the prefilter does not stick out from under the cage please?
I will order the filter when I get home home from work, doing triple shift currently. Do you need me to ship you the materials needed for this upgrade or is just the filter itself good? I will use stockings over the prefilter not the KN one Afastcar used on his.


Send the filter I will see if I can get the 4" PVC stuff here I might even have some fittings left over from building this place I can use...

You see my note about the UNI filter in the air box itself? I took the UNI out of my wifes Pilot and am using you have another you can send? I use to have two spares but sent them both out on other Pilots then forgot to order replacements lol one went on the Harry ass Pilot and one on Mikeys Pilot...

Not sure I really need spares to carry with me on trips with the prefilters installed the filter in the box never really gets dirty enough to worry about, before the prefilter mod I use to dirty up 2-3 filters per ride trip.


Top
 Profile E-mail  
 
PostPosted: Sat Apr 28, 2012 2:23 pm 
Offline

Joined: Tue Dec 23, 2003 10:31 pm
Posts: 5559
Location: New Jersey
Sure can Hoser! Will order the K&N filter and direct ship. I will look for the stocl filter insert as well. I will order you several Uni filters as well from Rocky Mtn and ship direct to you.


Top
 Profile E-mail  
 
PostPosted: Sat Apr 28, 2012 4:30 pm 
Offline

Joined: Mon Dec 15, 2003 2:40 pm
Posts: 22507
Location: Chicago
Mudbogger wrote:
Sure can Hoser! Will order the K&N filter and direct ship. I will look for the stocl filter insert as well. I will order you several Uni filters as well from Rocky Mtn and ship direct to you.


Will only need one stock UNI for the LT Pilot unless you need extras.

Thanks


Top
 Profile E-mail  
 
PostPosted: Wed May 02, 2012 6:35 pm 
Offline

Joined: Mon Dec 15, 2003 2:40 pm
Posts: 22507
Location: Chicago
Update, so today between rains I was able to heat cycle the Engine a few more times then drained the water again much cleaner but still has a bunch of shit in the coolant no clue what this shit is looks like a mixture of cooling system additives every time I drain it I try to imagine what series of events happen that this shit is coming out of a cooling system, drawing a blank here...


Still much dirtier than I would want my cooling system.


Attachments:
DSC02048.JPG
DSC02048.JPG [ 32.19 KiB | Viewed 5101 times ]
Top
 Profile E-mail  
 
PostPosted: Wed May 02, 2012 6:44 pm 
Offline

Joined: Mon Oct 25, 2004 10:02 am
Posts: 2865
Location: East Peoria IL
replace those stainless bolts in the roll cage!


Top
 Profile E-mail  
 
PostPosted: Wed May 02, 2012 6:49 pm 
Offline

Joined: Mon Dec 15, 2003 2:40 pm
Posts: 22507
Location: Chicago
I need to take this Pilot for some short rides to break it in the big delema is HOW, this is one of them butchered up ATV Racing Pilots where it takes a good hour to reinstall the seat, when they performed this butchery they also removed the factory seat mounts so taking a stock seat out of my Pilot (takes 2 minutes) then dropping it into this Pilot (would only take 2 minutes if it had the brackets) is out of the question.

This has the stupid fire wall to keep from burning up the after market seat, I guess it was too hard for the boys at ATV racing to incorporate a heat shield into the seat like HONDA did.

They also didnt incorporate a skid plate into the seat like HONDA did they invented this POS belly skid that takes hours to install or remove it also blocks access to the bolts that hold in the seat.

Every time I look at this pile of stupidity I don't know if I should laugh or cry this is jackassery at its absolute best! Cant understand why so many people praise the ATV Racing stupidity so much and so often.

See I need to continue to flush the cooling system until clean I am guessing it needs flushed at lease two more times this means fight the heat shield back on then fight bolting in the seat (takes about an hr) take it for a 10 min cruise around the yard then remove the seat and heat shield (takes about an hr) drain the coolant, refill the radiator, reinstall the heat shield and seat (takes about an hr) take it for another 10 min cruise, remove the seat remove the heat shield (takes about an hr) so I can drain the coolant again.

Starting to see the stupidity.

No clue how owners of these Pilots maintain them I don't see them removing the seat and firewall so they can change their balancer oil or drain the coolant on a regular basis same goes with this after market skid plate with no provisions to drain the balancer or trans oil.

Look close at the picture just like the ATV Racing steering modifications when you install their butchered up seat shit you have to butcher up your foot tub even MORE lmao, and people actually pay for this poorly engineered rigged up shit glad others are impressed lol .


Attachments:
DSC02053.JPG
DSC02053.JPG [ 83.49 KiB | Viewed 5099 times ]
Top
 Profile E-mail  
 
PostPosted: Wed May 02, 2012 6:59 pm 
Offline

Joined: Mon Dec 15, 2003 2:40 pm
Posts: 22507
Location: Chicago
rmesser wrote:
replace those stainless bolts in the roll cage!


I have the OEM bolts to install that is on the list, can you believe someone was actually dumb enough to remove special engineered high quality chrome plated bolts and installed these stainless steel crap? haha


Top
 Profile E-mail  
 
PostPosted: Wed May 02, 2012 7:26 pm 
Offline

Joined: Tue Dec 16, 2003 2:45 pm
Posts: 885
Jackassery™/Stoneman :-)


Top
 Profile  
 
PostPosted: Wed May 02, 2012 7:55 pm 
Offline

Joined: Tue Dec 23, 2003 10:31 pm
Posts: 5559
Location: New Jersey
Hoser, do you think we should try to go BACK to the OEM set up seat wise? Or is that just adding more time into the equation? I have 2 extra OEM seat here, and I prefer the stock seat. How is the leg room with the current seat in it? On my pilot I have with that full skid I drill holes out using a hole saw for access to the stock OEM bolts, works well for me. I just put the seat all the back on the stock mounts, mark it and rill them out. Would fabbing and welding some brackets back in the stock OEM locations on the frame be an option?


Top
 Profile E-mail  
 
PostPosted: Fri May 04, 2012 12:07 pm 
Offline

Joined: Mon Dec 15, 2003 2:40 pm
Posts: 22507
Location: Chicago
Mudbogger wrote:
Hoser, do you think we should try to go BACK to the OEM set up seat wise? Or is that just adding more time into the equation? I have 2 extra OEM seat here, and I prefer the stock seat. How is the leg room with the current seat in it? On my pilot I have with that full skid I drill holes out using a hole saw for access to the stock OEM bolts, works well for me. I just put the seat all the back on the stock mounts, mark it and rill them out. Would fabbing and welding some brackets back in the stock OEM locations on the frame be an option?


The factory seat mounts were 100% cut off and are gone the frame ground smooth and painted you would be starting all over again, you would need to have new brackets fabricated this would require slots to be milled into the mounts if you wanted it adjustable.


Top
 Profile E-mail  
 
PostPosted: Fri May 04, 2012 12:23 pm 
Offline

Joined: Mon Dec 15, 2003 2:40 pm
Posts: 22507
Location: Chicago
I was going to take the Pilot for a ride when Tpreed was here as I was backing up he stopped me said looked like the rear wheel bearings were loose or bad well after putting it back into the shop and jacking it up turns out who ever did this LT mod used 1/2" hiems, drilled 1/2" holes in the frame mounts, used 1/2" spacers for the hiems then used the factory sized metric bolts so they were just flopping around.

Not sure why 1/2" bolts were not used only thing I can figure is the moron that installed them felt the need to use up the rest of his blinghomo bolt kit.

You really think honda spent 10x more on a bolt than they needed to for no reason?

Gotta go buy some 1/2" bolts to replace the WRONG BOLTS but the WRONG BOLTS will look pretty at the bottom of my garbage can :-)


Attachments:
DSC02081.JPG
DSC02081.JPG [ 86.48 KiB | Viewed 5072 times ]
Top
 Profile E-mail  
 
PostPosted: Fri May 04, 2012 12:28 pm 
Offline

Joined: Mon Dec 15, 2003 2:40 pm
Posts: 22507
Location: Chicago
While invistigating the lose suspension problem I discovered the rear right tire is all dry rot and is even split on the side wall.

These tires have other issues too, for one they are too short for a Pilot they are 20" tall holes shots be ok if your racing on a short oval dirt track other than that have no use on a Pilot, the other problem is they are just about worn out.

I happen to have a like new set of 22" holeshots I would be willing to sell you, I bought these at the advice of a few others under the guise they gave better traction than the OEM tires did, I tested them on dirt, hard pack and soft pack, grass and at the dunes they have less traction than the OEM tires so I never used them they been on the shelf ever since, they still have the teets on them.


Attachments:
DSC02082.JPG
DSC02082.JPG [ 78.78 KiB | Viewed 5072 times ]
File comment: .

Old left new right

.

DSC02058.JPG
DSC02058.JPG [ 101.53 KiB | Viewed 5072 times ]
DSC02057.JPG
DSC02057.JPG [ 65.36 KiB | Viewed 5072 times ]
DSC02056.JPG
DSC02056.JPG [ 62.21 KiB | Viewed 5072 times ]
Top
 Profile E-mail  
 
PostPosted: Fri May 04, 2012 12:31 pm 
Offline

Joined: Mon Dec 15, 2003 2:40 pm
Posts: 22507
Location: Chicago
I also have ONE bead lock rim identical to the bead locks on the rear of your LT Pilot in every way but might be 1/2" narrower on the rim width I will have to take a closer look at it are you interested in the rim?


Attachments:
DSC02054.JPG
DSC02054.JPG [ 73.67 KiB | Viewed 5072 times ]
Top
 Profile E-mail  
 
PostPosted: Fri May 04, 2012 1:04 pm 
Offline

Joined: Tue Dec 23, 2003 10:31 pm
Posts: 5559
Location: New Jersey
Yes to tires and rims Hoser. I will buy them both please off you.


Top
 Profile E-mail  
 
PostPosted: Fri May 04, 2012 3:52 pm 
Offline

Joined: Mon Dec 15, 2003 2:40 pm
Posts: 22507
Location: Chicago
Mudbogger wrote:
Yes to tires and rims Hoser. I will buy them both please off you.


Ok I will swap the new tires over onto the bead locks for you...

I changed the bolts where the lower control arms connect to the frame installing 1/2" bolts dropped right in, not sure what to do on the other end of the links at the wheel where you have that long metric bolt, they are still tight but you still have a metric bolt in a standard hole.

I cant understand why when they designed and fabricated the lower links they didnt change everything to 1/2" or just buy the metric hiems not sure I follow their thought process .

While changing the bolts on the drivers side I noticed their is a small cut in the CV boot so I cleaned it up, used my needle greaser to pump more grease into the CV boot then cleaned it will and patched with yamabond 4 to see if it will seal it up, the CV boot will need replaced I wanted to be able to keep driving the Pilot while waiting for another CV boot, I will look closer at the rest of the boots see if they need changing, this is a puncture not dry a crack from dry rot.

The cooling system has cleared up enough to install the 50/50 coolant :-)


Attachments:
Dsc02088.jpg
Dsc02088.jpg [ 95.38 KiB | Viewed 5059 times ]
DSC02089.JPG
DSC02089.JPG [ 55.43 KiB | Viewed 5059 times ]
DSC02090.JPG
DSC02090.JPG [ 69.53 KiB | Viewed 5059 times ]
Top
 Profile E-mail  
 
Display posts from previous:  Sort by  
Post new topic Reply to topic  [ 136 posts ]  Go to page Previous  1, 2, 3, 4, 5, 6  Next

All times are UTC - 5 hours [ DST ]


Who is online

Registered users: Bing [Bot], Garemie, Google [Bot]


You cannot post new topics in this forum
You cannot reply to topics in this forum
You cannot edit your posts in this forum
You cannot delete your posts in this forum
You cannot post attachments in this forum

Jump to:  
cron
Powered by phpBB® Forum Software © phpBB Group