Pilot driven Clutch by hoser..
Here is the driven clutch off my Pilot I have the pulleys spread apart using the spreader bolt. If you don't have get one, this is considered a special tool and it came with the Pilot when new and was located in the tool kit, you need to use this bolt when changing the belt. Bolt for Pilot driven clutch spreader BOLT, FLANGE (10X28) 95701-10028-08 Cost $1.29 from Hillside Honda.In this picture you can see where the plating has worn off the clutch faces, it is a hard chrome plating but is not shiny like regular chrome, once the plating wears off the exposed metal will rust, Pilots with driven clutches in this condition stored in high humid conditions will rust then the rust will form pits in the metal and greatly shorten belt life.
See the wear area about dead center of the clutch face, my guess is it wears more here because the belt spends most of its time in this zone while the Pilot is in motion and is in that position when the power really comes on.
Here you can see the spreader bolt from the back side, the end of the bolt pushes against the movable face to spread the clutches, there is also a 'hidden area' here where remains of a shredded belt can get trapped, most of the time spreading the clutches with the bolt will allow you to remove the remains of the belt sometimes complete disassembly of the driven is needed to removed the more resistant parts of the belt, leaving threads in this 'hidden area' will not allow the clutch to return to the fully closed position.
Spring compressed.
Home made puller I made for a FL250 driven clutch also seems to work on the Pilot but the fit is not exact I will fabricate a better fitting piece one of theses days, I used a piece of 5/16 threaded rod about 12" long with nuts and washers on the other end, you tighten the top nut down to compress the spring enough to remove the snap ring on the end of the shaft then slowly loosen the nut to control spring tension, you assemble in reverse order using the home made tool to compress the spring again, make sure you have the snap ring around the threaded rod before you start to compress the spring.


A better look at the worn faces.
There is about .010 wear in the worst area.
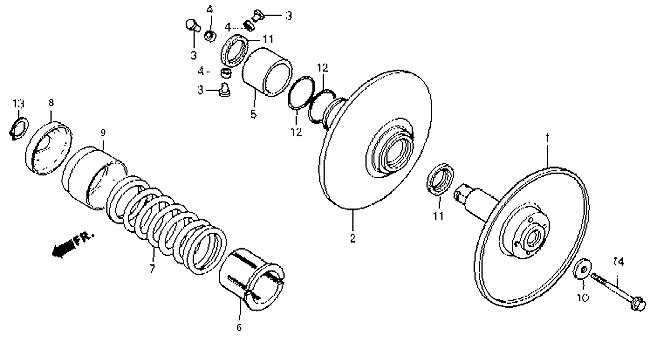
Parts break down
Modifications 2002
1 22210-HE0-000 Face, Driven 89 1 22210-HE0-670 Face, Driven 90 2 22220-HE0-000 Face, Movable Driven 89-90 3 22231-HE0-000 Pin, Roller Guide 89-90 4 22232-HE0-000 Roller, Guide 89-90 5 22233-HE0-000 Collar, Seal 89-90 6 22234-HE0-000 Collar, Spring Guide 89-90 7 22235-HE0-000 Spring, Driven Face 89-90 8 22236-HE0-000 Seat, Driven Spring 89-90 9 22237-HE0-000 Cover, Driven Spring 89-90 10 90456-HE0-000 Washer 89-90 11 91213-HE0-003 Oil Seal 89-90 12 91352-KM1-005 O-Ring 89-90 13 94511-36175 Circlip, External 89-90 14 95701-10075-00 Bolt, Flange 89-90